Note: This article is a work in progress. I’ll make some edits and updates, and add some screenshot image later.
Since my previous declaration that I’m ready to take the Drupal plunge, this journey started a few weeks ago with reading a good bit of documentation on Drupal 8 from Google searches. Then I had a look at some tutorials on Drupal basics in Lynda.com, namely Drupal 8 Essential Training: 1 The Basics and Install Drupal’s database on *nix. I didn’t have the patience to sit through the whole of both of them, though, because I really wanted to get started, naturally. Also, the Drupal 8 Essential tutorial was taking the approach of installing Acquia Dev Desktop and I had another approach in mind of installing and managing Drupal 8 to employ my local installation of MAMP. I’d kinda settled on the idea of installing Composer via my Mac’s bash terminal, and then Drush to manage the site, and I also wanted to employ Git for version control. After much searching and reading, I came across this blog post (https://www.chenhuijing.com/blog/drupal-101-getting-started-with-d8) by Chen Hui Jing. His seemed like the most straightforward, plain-language instructions I’d found so far, so I decided to try following his instructions, particularly his instructions on how to install Drupal 8 with Drush, for which he kindly provided a link to another of his blog posts (https://www.chenhuijing.com/blog/team-drupal-development) with instructions on how to install first Composer, then Drush, via bash terminal.
My installation of Composer seems to have gone fairly smoothly, so far as I can tell. I entered the install command, was able to verify its version and in which directory it lived, and moved it to my preferred directory to make it global.
 However, Installing Drush did not go so smoothly. I got an unfortunate [InvalidArgumentException] error because my Mac is running an older version of PHP. This would be because I’m still using OS 10.11 El Capitan (which I affectionately refer to as ‘The Captain”), whose built-in PHP instance is 5.5.38. Newer versions of Mac OS naturally have newer versions of PHP that come by default. Now, I actually turn on MAMP and run my local server environment that way, so this has not been a problem I’ve encountered for sites I’ve developed locally. And in MAMP 3, which I’m using, there is an instance of PHP version 5.6.7. After a bit more research, I found a way to instruct the computer to point to that PHP instance inside my MAMP directory via a vim shell command instead (https://gist.github.com/irazasyed/5987693). According to what I’d read, attempting to update the PHP instance in the default directory causes more problems than it seemed worth to pursue. But I will likely point the computer back to the original /usr/bin/php directory when my Drupal setup is all done, as I think I found a way to make this unnecessary (read on). Plus, I feel more comfortable leaving the OS with its default settings for most things, unless there is a real solid reason for changing them.
So, back to the Drush installation; After pointing the computer to the 5.6.7 version of PHP, I ran the Drush install command in my bash terminal again. It begins to download \(^o^)/!! But I also got a list of packages that failed to download with it. Something about SSL error messages… And when I tried to verify that Drush installed (which drush, and drush —version), I got nothing (-_-). So now what? More research on why the install failed.
After more searching, reading, watching tutorials, I eventually made my way back to the drush.org install instructions for Drupal 8 (http://docs.drush.org/en/master/install/). And what did it say? That the Drupal 8 project comes with Drush installed and you just have to list it as a dependency (>_<)! So, I guess I just need good, clear instructions on how to get Drupal 8 installed via Composer, which I did seem to manage installing correctly. The Drush.org page led me here: https://github.com/drupal-composer/drupal-project.
Not feeling entirely confident, as this is my first Drupal project, I still had questions about the best terminal command to use for this (further confusion created by this article: https://www.drupal.org/docs/develop/using-composer/using-composer-to-manage-drupal-site-dependencies). And I still had questions on how to make sure I installed my Drupal project into the correct directory and wanted to see what happens in advance by searching for what I hoped would be a clear video tutorial to follow regarding this. Which brings me to this video tutorial by Andrew Cornell: https://www.youtube.com/watch?v=gHrt4KJ2vmw. This tutorial addresses my two main interests with this, my first Drupal installation; using Drush to manage the site and using Git for version control. And so far, though maybe it takes Andrew a little while to get to the point, his instructions are clear, easy to follow, and his explanations aid in understanding what we’re doing at each step.
The next thing I need to address is what to use for a remote Git repository (‘repo’). I had assumed I was just going to use my GitHub account for this. But something that Andrew said in his tutorial stuck in my ear. So, Andrew is using GitLab as his remote repository, which apparently has the ability to make the project Private, Internal, or Public. In the free version of GitHub, everything is just public. You have to sign up for the paid version of GitHub in order to make your repo private. He said “Once I get a project to at least a level that I want to share it with the community, then I often push it to something like GitHub or BitBucket”. It got me thinking about whether I really want my repository code to be available to anyone or not. So I went ahead and signed up for a GitLab account. There are a few tiers of account to choose from, so I wasn’t sure if the private feature would be available on the free account. But I’m glad to report that the private setting is indeed available on GitLab’s free tier. So I’ve got the GitLab account now, but have decided, for the time being at least, that I will go ahead and use my GitHub account for my first connection to a remote repo. I have an ulterior motive for this, which is that I hope to demonstrate some ability with Drupal that will improve my marketability as a web developer fairly soon, and hiding my work won’t accomplish this goal. But I am definitely going to be experimenting with my GitLab account, too. As I poked around with the info regarding the GitLab account, I saw evidence that users seem to be forking or pushing their work back and forth between the two, and Andrew himself indicated that this is doable with relative ease. So I think it would be fun, and useful, to give it a try! Just, GitLab is still a bit of an unknown quantity at the moment and, at least for now, I want my work to be visible initially.
I also took a side road into viewing this tutorial before getting started with following Andrew’s steps above. I’m nervous, still have questions on whether I’m setting this site up correctly and want to understand as much about this setup process as possible before I take that plunge!
Drupal 8 + Composer for Absolute Beginners: https://www.youtube.com/watch?v=oWzGJQMB23I
Great presentation. The presenter manages to keep things simple yet detailed with her explanations. I feel like this was a useful video and I understand the Drupal 8 setup with Composer a little better. Ultimately, I decided to go back to Andrews tutorial and follow his steps.
So, back to Andrew’s tutorial. I’ve watched it three times now, so I’m feeling more confident. He’s actually working in a Windows 10 Linux subsytem (that’s how he described it) and I’m working on a Mac, as mentioned above. At the end of the video, he opted to work with Apache and MySQL in a different way than I will, which, for me, will be to use MAMP. (EDIT THIS!!)
I’ll list in steps what took him a 30-minute video to suss out for us:
1. Go to Bash terminal. So, launch your Windows command prompt and type ‘bash’ (no quote marks) and you’re in the bash shell. OR, launch your Mac terminal, which should be bash by default.
1.1 [3:30] check which version of Composer you are running, and where you are running it. Andrew and I have both installed Composer globally, meaning it is accessible throughout our computer’s system regardless of which directory (aka folder) you are in. I’m calling this step 1.1 because Installing Composer is actually a whole additional step that needs to be taken before and outside of the scope of his tutorial (see the links in one my paragraphs above about installing this). So, if you haven’t installed Composer by this point, do it now! You can install it locally just into the directory you want to run this Drupal installation or you can install it globally, as we have; your choice.
1.2 [5:06] Make sure you have Git installed in your system, as well. We’ll be using Git to clone a Drupal repository from GitHub into our local system directory. That is how Drupal will be installed, as opposed to downloading a ZIP file from the Drupal site, uncompressing and installing it that way, which is the more traditional way you might already be familiar with if you’ve worked with other CMS’s like WordPress, Joomlah!, or have installed previous Drupal sites yourself. If you don’t have Git already, find tutorials on installing it. Basically, if you’re going to go the command prompt/terminal route to working with Drupal, there are a few command line tools you’ll want to have installed in your system to accomplish this. If at any point I mention a command line tool that you don’t have, you’ll need to stop and find instructions on how to install it. I know it’s frustrating and it can take some time to figure out what you need and the best way to install it for your specific needs. I’ve been there and had to do it, too.
2. [7:05] Navigate to the directory (via your bash terminal) in which you wish to install your Drupal project.
3. [7:17] Install your Drupal site into this directory with Composer
I entered the command for this and, DAH!!, I get an error message.
[Composer\Downloader\TransportException]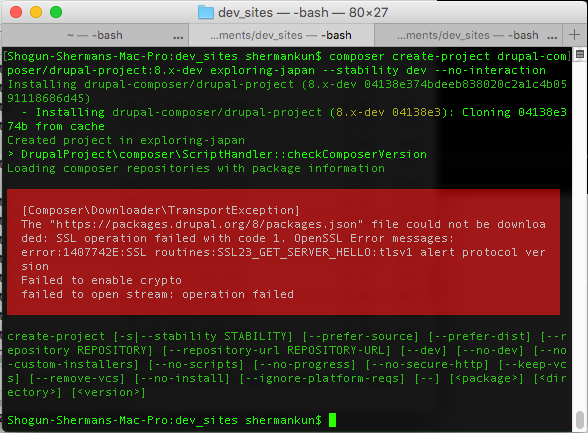
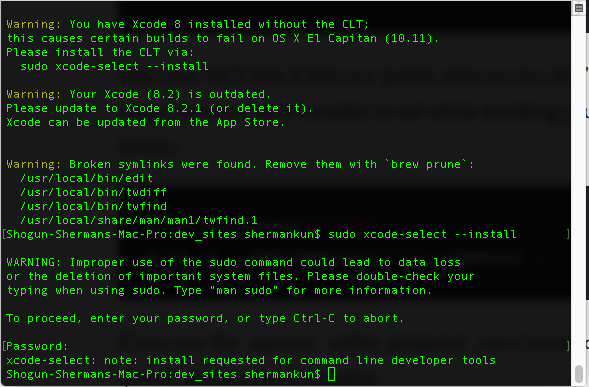
So, apparently I either have an older version of OpenSSL, or, according to this article (https://solitum.net/openssl-os-x-el-capitan-and-brew/), “Apple removed the OpenSSL header files in “El Capitan”, making it hard to build OpenSSL-dependent libraries without modifying your system a little bit.” Fortunately, Scott Wiersdorf is here to save the day with some instructions on how to fix this. So I follow them. In addition to installing OpenSSL, I’m also prompted via brew doctor to prune some broken symlinks and update XCode, both via command line and the apple store. Hopefully these installs don’t mess anything up! The App store install takes like 20 minutes. After brew doctor helps me fix a few things and update my XCode, the brew update and brew upgrade commands take maybe another 20 minutes or so.
 So, after running the brew doctor, brew update, and brew upgrade commands, then removing the exploring-japan directory I just created and attempting to re-install the drupal clone into my dev_sites directory, this appears to be where I’m stuck at the moment. I see three options (I’m sure there are more); 1) I can find a way to get a newer version of OpenSSL installed on my computer, 2) I can find a way to get Composer to finish the install despite the current version of OpenSSL, or 3) I can finally cave and upgrade to a newer version of Mac OS (10.12 Sierra or 10.13 High Sierra). And I know 10.14 Mojave is just around the corner, but I kinda like to keep a step or two back with my OS. I guess we’ll leave that as our cliffhanger for today. To be continued…