Archive for the ‘drupal 8’ Category

My first Drupal install journey, part 4

Posted on: March 23rd, 2019 by kentcjmiller No Comments

Below is a continuation of progress I had made about six months ago. I documented as I went, but didn’t post yet. I got side-tracked for a bit and am now just returning to this. I’ll have to go back through this material and edit for clarity later, but meanwhile…

In this post, I’ll pick up where I left off with Andrew Cornell’s tutorial video after the 15:08 mark. It looks like the following steps involve setting up a local MySQL database and starting the Apache server. Before he gets into this, Andrew discusses the maintenance of his Composer installation with updates into its many packages and the best approach to this. He discusses this up to the [17:30] mark, but doesn’t go into great detail and really gives no practical user instructions for this, so researching this might be best explored at a later time. Possibly, I could devote a post to this, but I won’t make any promises at the present time.

My last entry ended with step 16, so we’ll continue with:

17. [17:30] (optional) Navigate to the apache2 folder and update a conf file. He navigates to it quite directly from his localhost directory, which made me think it was nested in there initially, but after attempting to do the same and then looking around to see what was in there, I couldn’t find it. So, I changed directories back up to the root level and navigated into /etc/apache2/ from there. Once Andrew navigates into the apache2 directory, he then goes into another directory inside it named sites-enabled. This contains a file inside it called test.conf, named for the test site he is creating, I presume. He opens this file in a nano shell (sudo nano test.conf). In this file is some <Directory> markup with instructions on following symbolic links, allowing overrides and granting requirements.

The main reason Andrew brought us into this file is to write a redirect shortcut for the localhost path of the site he’s developing. In my case, it will look like this: RedirectMatch ^/exploring-japan/$ /exploring-japan/web

I’m listing this step as optional for now because I’m not sure how well this step is going to work for me. I had to create the sites-enabled directory and the exploring-japan.conf file from scratch and match the updates from his demo. They didn’t already exist previously and I’m not sure if my Composer installation will see this file, unless it has some built-in instructions to look for it, which Andrew doesn’t go into. So, we’ll see after I’ve got the database set up and the local server running!

18. [19:00] Via bash terminal, navigate back to your Composer directory (in my case, dev_sites/exploring-japan/), and then into web/sites/default/. Then open the settings.php file (sudo nano settings.php)

19. [20:00] Find this set of commented code and copy it:

 * $databases[‘default’][‘default’] = array (

 *   ‘database’ => ‘databasename’,

 *   ‘username’ => ‘sqlusername’,

 *   ‘password’ => ‘sqlpassword’,

 *   ‘host’ => ‘localhost’,

 *   ‘port’ => ‘3306’,

 *   ‘driver’ => ‘mysql’,

 *   ‘prefix’ => ”,

 *   ‘collation’ => ‘utf8mb4_general_ci’,

 * );

 @endcode

20. [20:10] Paste it at the bottom of the settings.php document, where you will modify it to this:

$databases[‘default’][‘default’] = array (

   ‘database’ => ‘databasename’,

   ‘username’ => ‘sqlusername’,

   ‘password’ => ‘sqlpassword’,

   ‘host’ => ‘localhost’,

   ‘port’ => ‘3306’,

   ‘namespace’ => ‘Drupal\\Core\\Database\\Driver\\mysql’,

   ‘driver’ => ‘mysql’,

   ‘prefix’ => ”,

   ‘collation’ => ‘utf8mb4_unicode_ci’,

);

$settings[‘install_profile’] = ‘standard’;

I’ll be changing my databasename, sqlusername, and sqlpassword, of course. I’d say name the database after the site that you’re working on, and make a username and password that suit you. Note that a line for ‘namespace’ has been added. Andrew’s example didn’t have a ‘collation’ line, but I think there’s no harm in keeping it. I did some research into why utf8mb4_general_ci is being used. I think prior to Drupal 8, utf8_general_ci had been used, so this is an updated standard. However, I decided to go with utf8mb4_unicode_ci instead, as, according to this post from Stack Overflow (https://drupal.stackexchange.com/questions/166405/why-are-we-using-utf8mb4-general-ci-and-not-utf8mb4-unicode-ci), it seems to allow for a greater range of characters outside the English language. This will affect sort order of tables in your database, so it’s best to make this decision at the outset of your Drupal project, not after its development is well underway or long established. I’ve left all the other lines as they were.

Once you’ve entered all your new settings, type control + x to Exit, then y to indicate you wish to save your changes, then the ENTER (or RETURN) key to indicate you’re writing to the file named settings.php. This should bring you back to the bash terminal, and your updates to the file have been made.

21. [23:00] New we’ll fire up the Apache server with sudo service apache2 start…

But this did not work (-_-).

So I did some searching and found this: http://osxdaily.com/2012/09/02/start-apache-web-server-mac-os-x/. With this, I set up a new config file in my user directory with the same as I had in the apache2 directory previously, and used this command instead to start the server running: sudo apachectl start. I had yo toggle it back off with sudo apachectl stop and then back on again in order to get it working, but now it’s operating fine.

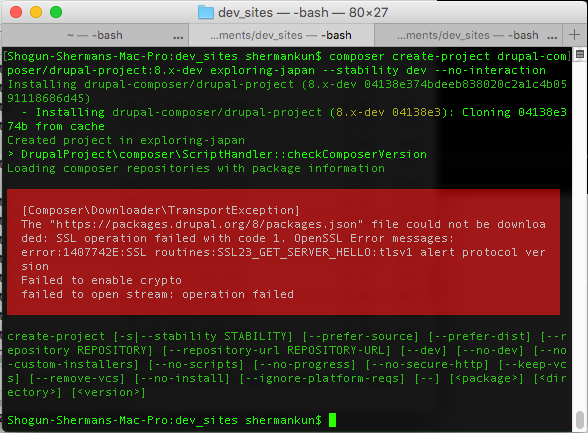
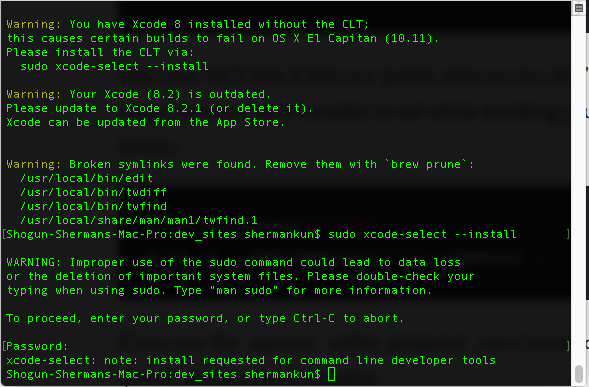
22. [23:12] Now, to fire up the MySQL database server: ‘sudo service mysql start’, which also did not work (-_-). It’s probably a similar issue to the server above, meaning that the Mac commands are slightly different from the Windows commands. Well, it turns that I might need to install MySQL. I’ve previously used MAMP for local development, which came with its own installation of MySQL, but I don’t think I can use it with the development approach I’m taking for this Drupal 8 site. I may try another way in the future, but for now It’s certainly not a bad thing for me to learn how to install MySQL directly. I’ll pick up from here when I continue…

So I made my way over to https://www.mysql.com/, which brought me to https://dev.mysql.com/downloads/ and eventually to the MySQL Community Server downloads page (https://dev.mysql.com/downloads/mysql/). And naturally, El Capitan isn’t compatible with the latest version of MySQL, so I had to dig a little deeper to find the archived downloads section, and there (https://downloads.mysql.com/archives/community/) I was able to identify the last compatible version of MySQL, 5.7.16, and download it.

I also downloaded Sequel Pro, which I used to choose my socket connection. So then I fired up the MySQL server successfully this time, along with the Apache server. I navigate to the site in my browser, but still no joy when I navigate to localhost on my browser. I tried plain localhost and I tried localhost:8888, which is where I see sites I develop while running MAMP. Perhaps it’s a different port?

Then I try 127.0.0.1, which I learned here (http://support.moonpoint.com/os/os-x/apache/) is the default locahost address when running Apache on the El Cap Macintosh.

Well, Holy @$$%#, I think I just need to create a virtual host in my user directory! I will then point to it with the httpd-vhosts.conf file. Let’s have a go at this.

I follow the instructions for instructing my system to serve pages from my user directory

So close! So close…

My first Drupal install journey, part 3

Posted on: August 1st, 2018 by kentcjmiller No Comments

So, friends, we left off with a freshly installed Drupal project on our local drive, along with an updated time zone setting in the .ini file that was provided with the customized PHP install.

I think the next thing to do is continue documenting the steps from Andrew Cornell’s tutorial. Today, I think this will involve the establishment of a Git repository, which will be on GitHub for now. I may move it to GitLab at some point.

So to recap (see part 2 for more details):
1. Go to Bash terminal.
1.1 [3:30] check which version of Composer you are running, and where you are running it. You can install it locally just into the directory you want to run this Drupal installation or you can install it globally, as we have; your choice. Again from my part 2 post, install Composer prior to following the steps in Andrew’s tutorial.
1.2 [5:06] Make sure you have Git installed in your system, as well. We’ll be using Git to clone a Drupal repository from GitHub into our local system directory.
2. [7:05] Navigate to the directory (via your bash terminal) in which you wish to install your Drupal project.
3. [7:17] Install your Drupal site into this directory with Composer:
composer create-project drupal-composer/drupal-project:8.x-dev some-dir –stability dev –no-interaction
Command found here: https://github.com/drupal-composer/drupal-project
=== This is where we left off from part 1 and resolved in part 2 ===
4. [8:50] Navigate into new local site directory via terminal/command line.
5. [9:50] Create git repository in local site directory ‘git init’
6. [10:18] Add untracked files to new repository in order to track them. ‘git add .’
7. [10:30] Commit the newly added files, along with a message ‘git commit -m “your message here” ’
8. [11:00] create new development branch in order to avoid working directly in the the master branch. I’m gonna call my new branch the develop branch ‘git branch develop’. Andrew called his ‘test’, which I think is potentially a more confusing branch name. If you’re new to Git (and I’ll admit I’m fairly new myself), here is a great guide on Git naming conventions and workflow: https://nvie.com/posts/a-successful-git-branching-model/.
9. To see your branches in the terminal/command line, type ‘git branch -l’. You will see that you are currently working on the master branch, as indicated by the asterisk (*).
10. [11:16] You’ll want to move to the new develop branch before you begin working. How to do this? In your terminal, type ’git checkout develop’
11. [11:43] Prepare to create a remote repository. You’ll need a host for your git repository. It is entirely possible to create one on your own server somewhere, but there are a few free options, as well, GitHub, GitLab, and BitBucket being among the most popular. The advantage (or disadvantage) of these is that you can make your work public and show off what you’ve been up to, share useful code, and be part of a community as a means of tech, and possibly moral, support! You’ll need to sign up for one (or more) of these free accounts if you wish to use them. You can see my comments in part 1 of these Journey posts about this. Andrew is going with GitLab, but I’m going with GitHub this time. I think it is possible to move from one to the other if I change my mind at a later date.
[11:58] Log into your Git repository account of choice, create a new project and name it (I recommend naming by your website’s name or plugin name or app name, etc. Here’s a good guide on choosing a name for your project: http://gravitydept.com/blog/devising-a-git-repository-naming-convention)
11.1 Before clicking the ‘Create Repository’ button, consider what license you wish to operate the project under. GitHub offers a nice guide for this (https://blog.github.com/2013-07-15-choosing-an-open-source-license/). I’m sure the other accounts do, too.
12. [12:38] Copy the ssh path of your new remote repo. If you used GitLab, like Andrew, you can see how he found it in his video. For GitHub, once you’ve created the new repo, you will see a button labelled ‘Clone or download’ on the repo page. Click that and then you can copy the ssh path there (or you can choose to ‘Use HTTPS’, if you prefer).
13. [12:44] Use that ssh path to create your remote from your terminal/command line. ‘git remote add [remote-name] [paste-ssh-path-here]’
14. [13:14] Enable ssh agent for pushing and pulling to the remote repository. ‘eval $(ssh-agent -s)’
15. [14:04] Add ssh key in order to automate the push/pull processes to the remote repo.
15.1 You may need to add an ssh key from your ssh-agent and then add it to your remote repository before Andrew’s instructions in step 15. (I did, which is why I bring this up). https://help.github.com/articles/connecting-to-github-with-ssh/. You’ll need to add your private key locally via the terminal (for my mac, it was id_rsa) and then copy via terminal command your public key (id_rsa.pub) and add that to the remote repository. GitHub details the required steps in the above-provided link.
And voila! You now have an SSH link to your remote repository. Once you have done this, you can…
16. [14:20] Push your local Git repository into your remote repository and (if it is public) show it off to the world! ‘git push [remote-repository-name] [branch-name]’. And here is mine, pushed to my GitHub account. https://github.com/janusoo/exploring-japan.com/tree/develop

I think I’ll end it here for today folks. There’s still plenty more to do, of course; pushing new code to the hosted web URL, adding Drupal themes, making updates and pushing them to the remote repository, cloning the repo to another local drive (not necessarily in this order). We’ll continue following Andrew’s tutorial toward completion in part 4, and then explore other necessary development actions after that.

My first Drupal install journey, part 2

Posted on: July 9th, 2018 by kentcjmiller No Comments

Well, friends, here we are, back at it with the Drupal project.

The following events took place a couple weekends back. I was simply too busy at the time to post my documentation, and too busy since then to come back to it, as well…

To recap, I was last faced with a decision of what to do about my OpenSSL inadequacies. Basically, 1) find a way to upgrade within OS 10.11, 2) find a way to make Composer ignore the problem, or 3) upgrade to a mac OS that has a satisfactory default version of OpenSSL.

I’m going with option 1 first. So today I’m spending some time searching for issues related to upgrading OpenSSL in my good friend, The Captain (El Capitan, in case you haven’t read the previous post). After reading through a few Stack Overflow posts related to this, I was able to verify that my brew install did, in fact, put an acceptable version of OpenSSL on my computer, 1.0.2o. So, now I need to figure out how to get Composer to see and accept this and I think we’re in business.

According to this response in Stack Oveflow, I might just need to start a new bash shell: https://stackoverflow.com/questions/39824045/openssl-not-getting-linked-with-homebrew. Well, that seems likely. I’ve had several shells open since the beginning of this project. The sessions even continued after relaunching the computer. I was worried about losing any of the history of what I have attempted so far, so I kept them going. So, now I’ve just saved their contents as rtf files and will relaunch a new bash terminal and try installing Drupal with composer again.

So, now with my new bash session, I use cd to navigate back into the dev_sites directory and then remove the failed exploring-japan directory with ‘rm -rf exploring-japan’. You can also do this by moving the failed directory to your trash can via Mac’s GUI, of course, but I’m getting myself comfortable with the command line, remember? There is a significant difference between the two methods that must be noted, however. Using Mac’s GUI, you must first move a file or directory to the trash can and then empty it if you wish to permanently delete it from your drive. There is no intermediary step with the command line. Once you remove it, it’s basically deleted, gone forever. I’m sure someone more familiar with the Mac/Linux/Unix command line knows of a way to restore deleted file, but I suspect there is some elevated level of effort involved. By default, a simple ‘rm ’ command will not do. You will get a warning that the directory cannot be removed because it isn’t empty. This is a built-in safety precaution I presume. Hence the addition of ‘-rf’ , which means ‘recursive force’ (recursive = the target directory and everything that’s inside it; force = ignore warnings). So… use this command cautiously. If you remove the wrong directory, like if you go too high up in the root order, you lose that directory (folder) and everything that’s inside it. You could potentially render your computer useless if there are no failsafes built into your OS. I’ve heard this is a known problem in several Linux systems, and since Mac OS is related, the potential for the same is there, though I have no intention of testing it out at present. Hmm… Might be fun to attempt after a backup, on a computer that doesn’t have anything crucial going on at the time…

Anyway, back to our story, our intrepid hero (me), has saved rtf files of his old bash sessions, closed his terminal, relaunched a new bash shell, and has once again run the ‘composer create-project’ command. And, sadly, we get the same failed download message complaining about the incorrect version of OpenSSL (-_-). So, we’re back to making Composer see, or link, to the recently installed, correct version of OpenSSL.

The install failed because OpenSSL has reverted to version 0.9.8zh, which I confirmed by checking the version in the terminal (‘OpenSSL version’). Seems like the brew install didn’t take? More likely I didn’t link it properly after the install. Another possibility is that it reverted after a system update, or even after a reboot. A little more soul (google) searching brought me to this Stack Overflow article (https://stackoverflow.com/questions/38670295/homebrew-refusing-to-link-openssl). I followed the instructions provided by mcgwier on Aug 2 ’16 at 0:58, entitled ‘Manually install and symlink’. These instructions appear to have gotten the updated OpenSSL version 1.0.2o to stick! And I’ve redirected my system to look in the newly created src directory for this version of OpenSSL. So we’ll try to install the Drupal project again. And it fails again (-_-).

So, more searching brings me here: https://www.youtube.com/watch?v=vT5luUaAcQ8. This fellow, Nate LeClair (I’m guessing on the spelling), provides a video tutorial and also introduces me to this site, https://php-osx.liip.ch/, which I am bookmarking post haste! I’m hoping this is the Godsend it appears to be! It looks like it will install an updated version of PHP for you and also provides instructions to ensure that your mac system (from OS X 10.6 Snow Leopard to Mac OS 10.13 High Sierra, as of this writing) can have versions of PHP from 5.3 to 7.2 (again, as of this writing), installed. I’m definitely giving this a go! Of course, all the solutions thus far have seemed like the last great hope until they failed…

Before following the instructions, I went back to my hosting account to verify which version of PHP I have available. I have a few, it looks like, but I’m going with 7.2, as it’s latest one available. So I will match that version in my local environment.

So. What happened this time? No error messages. So I guess that means I’ve successfully installed Drupal 8 with Composer. \(^o^)/

It’s 2AM at this point in my story, so I think I’m going to get some sleep and will review the install and see about next steps in the next day or so.

epilogue: This evening, before posting, I took a little time to reset the time zone to “America/New_York” in the file titled 99-liip-developer.ini that came with the PHP installation. I initially tried just using one of my text editors (tried with VS Code and Brackets), but kept getting permission errors when I tried to save the file. I ended up opening it in vim via the terminal using the sudo command.

My next plan will be to set up the remote Git repository, to see how the site looks in my local server and to actually get it up on my live server. I did, as mentioned previously, actually buy a domain name about a month ago, but a couple new ideas started swimming around in my head, so we’ll see what I ultimately decide to name the project at a little later date.

To be continued…

My first Drupal install journey, part 1

Posted on: June 11th, 2018 by kentcjmiller No Comments

Note: This article is a work in progress. I’ll make some edits and updates, and add some screenshot image later.

Since my previous declaration that I’m ready to take the Drupal plunge, this journey started a few weeks ago with reading a good bit of documentation on Drupal 8 from Google searches. Then I had a look at some tutorials on Drupal basics in Lynda.com, namely Drupal 8 Essential Training: 1 The Basics and Install Drupal’s database on *nix. I didn’t have the patience to sit through the whole of both of them, though, because I really wanted to get started, naturally. Also, the Drupal 8 Essential tutorial was taking the approach of installing Acquia Dev Desktop and I had another approach in mind of installing and managing Drupal 8 to employ my local installation of MAMP. I’d kinda settled on the idea of installing Composer via my Mac’s bash terminal, and then Drush to manage the site, and I also wanted to employ Git for version control. After much searching and reading, I came across this blog post (https://www.chenhuijing.com/blog/drupal-101-getting-started-with-d8) by Chen Hui Jing. His seemed like the most straightforward, plain-language instructions I’d found so far, so I decided to try following his instructions, particularly his instructions on how to install Drupal 8 with Drush, for which he kindly provided a link to another of his blog posts (https://www.chenhuijing.com/blog/team-drupal-development) with instructions on how to install first Composer, then Drush, via bash terminal.

My installation of Composer seems to have gone fairly smoothly, so far as I can tell. I entered the install command, was able to verify its version and in which directory it lived, and moved it to my preferred directory to make it global.

However, Installing Drush did not go so smoothly. I got an unfortunate [InvalidArgumentException] error because my Mac is running an older version of PHP. This would be because I’m still using OS 10.11 El Capitan (which I affectionately refer to as ‘The Captain”), whose built-in PHP instance is 5.5.38. Newer versions of Mac OS naturally have newer versions of PHP that come by default. Now, I actually turn on MAMP and run my local server environment that way, so this has not been a problem I’ve encountered for sites I’ve developed locally. And in MAMP 3, which I’m using, there is an instance of PHP version 5.6.7. After a bit more research, I found a way to instruct the computer to point to that PHP instance inside my MAMP directory via a vim shell command instead (https://gist.github.com/irazasyed/5987693). According to what I’d read, attempting to update the PHP instance in the default directory causes more problems than it seemed worth to pursue. But I will likely point the computer back to the original /usr/bin/php directory when my Drupal setup is all done, as I think I found a way to make this unnecessary (read on). Plus, I feel more comfortable leaving the OS with its default settings for most things, unless there is a real solid reason for changing them.

So, back to the Drush installation; After pointing the computer to the 5.6.7 version of PHP, I ran the Drush install command in my bash terminal again. It begins to download \(^o^)/!! But I also got a list of packages that failed to download with it. Something about SSL error messages… And when I tried to verify that Drush installed (which drush, and drush —version), I got nothing (-_-). So now what? More research on why the install failed.

After more searching, reading, watching tutorials, I eventually made my way back to the drush.org install instructions for Drupal 8 (http://docs.drush.org/en/master/install/). And what did it say? That the Drupal 8 project comes with Drush installed and you just have to list it as a dependency (>_<)! So, I guess I just need good, clear instructions on how to get Drupal 8 installed via Composer, which I did seem to manage installing correctly. The Drush.org page led me here: https://github.com/drupal-composer/drupal-project.

Not feeling entirely confident, as this is my first Drupal project, I still had questions about the best terminal command to use for this (further confusion created by this article: https://www.drupal.org/docs/develop/using-composer/using-composer-to-manage-drupal-site-dependencies). And I still had questions on how to make sure I installed my Drupal project into the correct directory and wanted to see what happens in advance by searching for what I hoped would be a clear video tutorial to follow regarding this. Which brings me to this video tutorial by Andrew Cornell: https://www.youtube.com/watch?v=gHrt4KJ2vmw. This tutorial addresses my two main interests with this, my first Drupal installation; using Drush to manage the site and using Git for version control. And so far, though maybe it takes Andrew a little while to get to the point, his instructions are clear, easy to follow, and his explanations aid in understanding what we’re doing at each step.

The next thing I need to address is what to use for a remote Git repository (‘repo’). I had assumed I was just going to use my GitHub account for this. But something that Andrew said in his tutorial stuck in my ear. So, Andrew is using GitLab as his remote repository, which apparently has the ability to make the project Private, Internal, or Public. In the free version of GitHub, everything is just public. You have to sign up for the paid version of GitHub in order to make your repo private. He said “Once I get a project to at least a level that I want to share it with the community, then I often push it to something like GitHub or BitBucket”. It got me thinking about whether I really want my repository code to be available to anyone or not. So I went ahead and signed up for a GitLab account. There are a few tiers of account to choose from, so I wasn’t sure if the private feature would be available on the free account. But I’m glad to report that the private setting is indeed available on GitLab’s free tier. So I’ve got the GitLab account now, but have decided, for the time being at least, that I will go ahead and use my GitHub account for my first connection to a remote repo. I have an ulterior motive for this, which is that I hope to demonstrate some ability with Drupal that will improve my marketability as a web developer fairly soon, and hiding my work won’t accomplish this goal. But I am definitely going to be experimenting with my GitLab account, too. As I poked around with the info regarding the GitLab account, I saw evidence that users seem to be forking or pushing their work back and forth between the two, and Andrew himself indicated that this is doable with relative ease. So I think it would be fun, and useful, to give it a try! Just, GitLab is still a bit of an unknown quantity at the moment and, at least for now, I want my work to be visible initially.

I also took a side road into viewing this tutorial before getting started with following Andrew’s steps above. I’m nervous, still have questions on whether I’m setting this site up correctly and want to understand as much about this setup process as possible before I take that plunge!
Drupal 8 + Composer for Absolute Beginners: https://www.youtube.com/watch?v=oWzGJQMB23I
Great presentation. The presenter manages to keep things simple yet detailed with her explanations. I feel like this was a useful video and I understand the Drupal 8 setup with Composer a little better. Ultimately, I decided to go back to Andrews tutorial and follow his steps.

So, back to Andrew’s tutorial. I’ve watched it three times now, so I’m feeling more confident. He’s actually working in a Windows 10 Linux subsytem (that’s how he described it) and I’m working on a Mac, as mentioned above. At the end of the video, he opted to work with Apache and MySQL in a different way than I will, which, for me, will be to use MAMP. (EDIT THIS!!)

I’ll list in steps what took him a 30-minute video to suss out for us:
1. Go to Bash terminal. So, launch your Windows command prompt and type ‘bash’ (no quote marks) and you’re in the bash shell. OR, launch your Mac terminal, which should be bash by default.
1.1 [3:30] check which version of Composer you are running, and where you are running it. Andrew and I have both installed Composer globally, meaning it is accessible throughout our computer’s system regardless of which directory (aka folder) you are in. I’m calling this step 1.1 because Installing Composer is actually a whole additional step that needs to be taken before and outside of the scope of his tutorial (see the links in one my paragraphs above about installing this). So, if you haven’t installed Composer by this point, do it now! You can install it locally just into the directory you want to run this Drupal installation or you can install it globally, as we have; your choice.
1.2 [5:06] Make sure you have Git installed in your system, as well. We’ll be using Git to clone a Drupal repository from GitHub into our local system directory. That is how Drupal will be installed, as opposed to downloading a ZIP file from the Drupal site, uncompressing and installing it that way, which is the more traditional way you might already be familiar with if you’ve worked with other CMS’s like WordPress, Joomlah!, or have installed previous Drupal sites yourself. If you don’t have Git already, find tutorials on installing it. Basically, if you’re going to go the command prompt/terminal route to working with Drupal, there are a few command line tools you’ll want to have installed in your system to accomplish this. If at any point I mention a command line tool that you don’t have, you’ll need to stop and find instructions on how to install it. I know it’s frustrating and it can take some time to figure out what you need and the best way to install it for your specific needs. I’ve been there and had to do it, too.
2. [7:05] Navigate to the directory (via your bash terminal) in which you wish to install your Drupal project.
3. [7:17] Install your Drupal site into this directory with Composer
I entered the command for this and, DAH!!, I get an error message.
[Composer\Downloader\TransportException]

So, apparently I either have an older version of OpenSSL, or, according to this article (https://solitum.net/openssl-os-x-el-capitan-and-brew/), “Apple removed the OpenSSL header files in “El Capitan”, making it hard to build OpenSSL-dependent libraries without modifying your system a little bit.” Fortunately, Scott Wiersdorf is here to save the day with some instructions on how to fix this. So I follow them. In addition to installing OpenSSL, I’m also prompted via brew doctor to prune some broken symlinks and update XCode, both via command line and the apple store. Hopefully these installs don’t mess anything up! The App store install takes like 20 minutes. After brew doctor helps me fix a few things and update my XCode, the brew update and brew upgrade commands take maybe another 20 minutes or so.

So, after running the brew doctor, brew update, and brew upgrade commands, then removing the exploring-japan directory I just created and attempting to re-install the drupal clone into my dev_sites directory, this appears to be where I’m stuck at the moment. I see three options (I’m sure there are more); 1) I can find a way to get a newer version of OpenSSL installed on my computer, 2) I can find a way to get Composer to finish the install despite the current version of OpenSSL, or 3) I can finally cave and upgrade to a newer version of Mac OS (10.12 Sierra or 10.13 High Sierra). And I know 10.14 Mojave is just around the corner, but I kinda like to keep a step or two back with my OS. I guess we’ll leave that as our cliffhanger for today. To be continued…